A sweet, simple hat for the little Valentine in your life. I started with one a basic hat recipe (I like the ones in Susan Anderson's Itty Bitty Hats) and embellished with hearts from I-cords knitted out from the top of the hat.
Size: Toddler (about 1-2 years)
Yarn:
MC: 120 yards worsted weight yarn (1 skein Lily Sugar ‘n’ Cream Solid Cotton: Pink)
CC: 40 yards worsted weight yarn (1 skein Lily Sugar ‘n’ Cream Solid Cotton: Pink and white variegated))
Materials:)
Size 6 16” cicular needle)
Size 6 double-pointed needles, set of 5)
Stitch marker)
Gauge: 5 stitches per inch in stockinette stitch
Pattern:
With MC, cast on 80.
Join for knitting in the round.
Place a stitch marker to denote beginning of round.
Knit every round until body of hat measures 6.25” from bottom edge (unroll as needed to measure)
Decrease for crown of hat as follows, switching to dpn’s as needed to accommodate smaller number of stitches.
Round 1: *K6, k2tog*, repeat to end of round
Round 2:*K5, k2tog*, repeat to end of round
Round 3:Knit
Round 4:Knit
Round 5:*K4, k2tog*, repeat to end of round
Round 6:Knit
Round 7:*K3, k2tog*, repeat to end of round
Round 8:Knit
Round 9:*K2, k2tog*, repeat to end of round
Round 10:Knit
Round 11:*K1, k2tog*, repeat to end of round
Round 12:*K2tog*, repeat to end of round
You should have 10 stitches remaining. Arrange stitches as follows on 4 double-pointed needles:
Needle 1: 2 stitches
Needle 2: 3 stitches
Needle 3: 2 stitches
Needle 4: 3 stitches
You will now be working with the contrasting color (CC) to make the cords that will form the top of the hat and the applied heart designs,
To make I-cord: On every row, *k to end, do not turn work, slide stitches to other side of needle*, repeat until cord is desired length
With CC:
Needle 1: Work 2 stitch I-cord for 16”. SSK. Fasten off remaining stitch and break yarn, leaving a 12” tail.
Needle 2: Work 3 stitch I-cord for 16”. Slip 1, SSK, pass slipped stitch over. Fasten off remaining stitch and break yarn, leaving a 12” tail.
Needle 3: Work 2 stitch I-cord for 16”. SSK. Fasten off remaining stitch and break yarn, leaving a 12” tail.
Needle 4: Work 3 stitch I-cord for 16”. Slip 1, SSK, pass slipped stitch over SSK. Fasten off remaining stitch and break yarn, leaving a 12” tail.
Finishing:
Tie together the two 2-stitch cords in a loose knot to close the opening at the top of the hat. Tie together the two 3-stitch cords over the top of the first knot. Don’t pull these tight and deform the shape of the hat.
Lay each cord out in a heart shape on the outside of the hat, and use the long tail at the end of each cord to attach to the body of the hat. I found it easiest to tack down the point at the bottom of the heart, then the indentation at the top, and then a few points around the perimeter of the shape.
Weave in all ends.
Showing posts with label hat. Show all posts
Showing posts with label hat. Show all posts
Wednesday, February 06, 2008
Sunday, October 14, 2007
Perpendicular Hat Pattern

This comfy, casual hat begins with a simple strip of garter stitch. This becomes the brim of the hat when joined into a circle. Stitches are picked up from the brim and worked upward for the body and crown of the hat.
Materials
Noro Silk Garden (45% Silk, 45% kid mohair, 10% lamb's wool; 100m/122yds per 50g skein); color: 249, 2 skeins
A: Skein #1
B: Skein #2
1 16” circular US 7/4.5 mm needle or size needed to obtain gauge
Set of 4 circular US 7/4.5 mm double-pointed needles or size needed to obtain gauge
Stitch marker
Scrap yarn (for provisional cast on)
Tapestry needle
Gauge
5 stitches per inch in stockinette stitch
4 stitches per inch in garter stitch
Finished Measurements
Circumference: 21 inches
Height: 8.5 inches
If possible, measure the head circumference of the intended receipient.
Pattern
Throughout the pattern, you will be working with two balls of yarn at the same time, alternating between balls every two rows. Even if the balls are the same colorway, starting each ball at a different point in the color sequence creates a striped effect. For a subtler stripe, wind balls to begin at a similar point in the sequence. For a more striking effect, choose two complementary or contrasting colorways and use one ball from each.
When changing yarns, bring the new yarn up from under the working yarn to maintain a neat edge.
Brim
The garter stitch brim strip is worked back and forth on two of the double-pointed needles.
With provisional cast on and A, cast on 12 stitches, leaving a 12” tail. The tail will be used for joining the garter strip into a circular brim.
Row 1(WS): With A, knit across.
Row 2(RS): With B, knit.
Row 3(WS): With B, knit.
Row 4(RS): With A, knit
Row 5(WS): With A, knit.
Repeat rows 2-5 until you have 72 garter ridges and piece is about 20 inches long (or equal to desired head circumference), ending with Row 3. Do not bind off.
Unzip provisional cast on and place stitches on another double-pointed needle. Thread tail from cast-on on to a tapestry needle.
Hold the needle holding the last worked stitches and the needle holding the unzipped stitches parallel, forming the brim into a circle. Using the tapestry needle, graft the stitches on each needle together using kitchener stitch. (Note: The graft-avoidant can use a three-needle bindoff instead.)
Body
Hold brim with RS facing. With A and circular needle, pick up one stitch between each of the garter stitch ridges on one edge. You should end up with a number of stitches equal to the number of garter ridges. Place marker to note beginning of round.
Round 1: With A, knit into front and back of each stitch.
Round 2: With B, knit.
Round 3: With B, knit.
Round 4: With A, knit.
Round 5: With A, knit.
Repeat rounds 2-5 until hat measures 8 inches from bottom edge of brim.
Crown
Begin decrease rounds for crown of hat, switching to double-pointed needles when stitches no longer fit comfortably on the circles. AT THE SAME TIME, maintain the two-row color pattern. (Decrease pattern assumes that you have a multiple of 8 stitches. If that is not the case, work a setup row before the decrease sequence to arrive at a multiple of 8, decreasing evenly around the body of the hat.)
Row 1: *K6, K2tog *, repeat to end of round
Row 2: Knit
Row 3: *K5, K2tog *, repeat to end of round
Row 4: Knit
Row 5: *K4, K2tog *, repeat to end of round
Row 6: Knit
Row 7: *K3, K2tog *, repeat to end of round
Row 8: * K2 , K2tog *, repeat to end of round
Row 9: *K1, K2tog *, repeat to end of round
Row 10: *K2tog*, repeat to end of round
Finishing
Cut yarn, leaving a 6” tail. Thread yarn on to tapestry needle and pull through remaining stitches to inside of hat. Weave in all ends.
Sunday, March 25, 2007
Sweetheart Hat
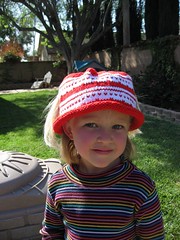
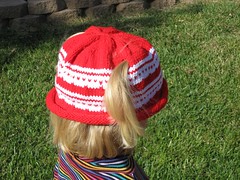
Modeled by my sweetheart. She chose this red and white Cotton Ease from my stash, and I made up a little two-color pattern as I went along. I thought the row of single red stitches in the white band looked like little hearts, hence the name.
Fair Isle Feature
I added in two pony holes at the crown to accomodate one of her mainstay hairstyles.
Marley Hat
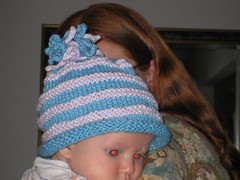
Adapted from Itty Bitty Hats, in blue and light purple Cotton Tots. I gave this to the daughter of one of Greg's co-workers.
Tuesday, March 13, 2007
Happy Birthday, Me!
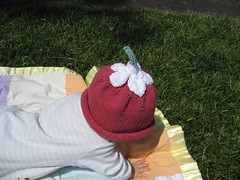
The Itty Bitty Hats book by Susan Anderson has several cute ideas in it. I made my second hat from it for Bea over the last few days. It's the upside-down daisy hat, in dusty rose and white. I used some Lion Cotton that I bought on Saturday afternoon, at the local Hancock Fabrics going out of business sale. That's the second local craft chain store to go under in the last few months. I picked up the cotton, some Magic Stripes sock yarn, a pair of purse handles, many buttons, and some ribbon yarn for trim. It's the first yarn purchase I've made since New Year's Eve - I've been knitting from my stash these past few months.
A few of my work friends and I went out to lunch today to celebrate my birthday, and while we were waiting for our order I finished turning the heel and picked up the gusset on Ellie's rainbow sock. It's turning out pretty cute.
Over the weekend I finished Ellie's sweater. I decided to skip any sleeve worries by making it a shell-style tank. The 90+ weather this weekend was a contributing factor in that decision.
I need to take some photos of all this!
Subscribe to:
Posts (Atom)


