Showing posts with label pattern. Show all posts

Wednesday, December 19, 2012

Flat Four Coaster Set


Coasters worthy of holding any of your favorite beverages, such as a Half Cycle IPA from local Indy brewery Flat 12 Bierwerks.  The pattern stitch forms a firm, dense fabric that holds its shape well and lies flat.

Materials:
  • Size 3 straight or circular needles or size to obtain gauge
  • About two ounces fingering weight yarn such as Koigu KPPM (for a set of 4). Sample shown is worked in madelinetosh tosh sock in the Filigree color. 
  • Tapestry needle for weaving in ends
Note: Yarn is held double throughout. You can pull one end from inside and outside of a center pull ball of yarn, or hold two separate strands together.  

Gauge: 22 stitches per 4 inches in pattern stitch with yarn held double

Pattern:
Holding yarn double and using long tail cast on, cast on 22.

Row 1 (WS): Knit to last stitch, slip 1 as if to purl with yarn in front
Row 2 (RS): Knit 1, *slip 1 as if to purl with yarn in back,  knit 1*, repeat from * to last stitch, slip 1 as if to purl with yarn in front

Repeat rows 1 and 2 nineteen more times for a total of 40 rows, or until piece is just shy of square, ending with row 2. 

Bind off all stitches loosely. Weave in ends.  Make three to four more.

Variations: 
  • Stripe by alternating between two colors, changing on the right side and carrying yarn not in use up the side. 
  •  Cast on 66 and work as written until piece is 16 inches long to create placemat


Thursday, August 27, 2009

Askance Cowl Pattern


photo.jpg
Originally uploaded by ShelbyD

Reversible diagonal ribbing is easy to memorize and shows off hand-painted or variegated yarn. Only requires one skein of something you want to snuggle near your neck.

Materials
Manos del Uruguay Silk Blend (30% silk, 70% Merino Extrafine Wool), 1 skein (150 yards)
16 inch circular needle, size 7 (or size needed to obtain gauge
Stitch marker
Tapestry needle

Gauge: 18 stitches in 4 inches in k3,p3 ribbing. Gauge is not crucial.

Circumference: 24 inches (Note: To adjust circumference to suit, you can cast on more or fewer stiches in multiples of 6)
Height: 6.5 inches

Pattern

CO 108.

Place marker to note beginning of round. Join to work in the round, being careful not to twist.

Work 3 rows k3, p3 ribbing.

Row 1: P1, k3, *p3, k3*, repeat between * to last 2 stitches, p2
Row 2: Repeat row 1
Row 3: P2, k3, *p3, k3* repeat between *to last stitch, p1
Row 4: Repeat row 3
Row 5: *P3, k3*, repeat between *to end of round
Row 6: Repeat row 5
Row 7: K1, p3, *k3,p3*, repeat between * to last 2 stitches, k2
Row 8: Repeat row 7
Row 9: K2, p3, *k3, p3*, repeat between * to last stitch, k1
Row 10: Repeat row 9
Row 11: *K3, p3*, repeat between * to end of round
Row 12: Repeat row 11

Repeat these 12 rows until piece is 6 inches or one half inch shorter than desired height, ending with an even row.

Work 3 rows of the next odd row. For example, if you end the body of the piece at row 6, you would work row 7 three times before binding off.

Bind off all stitches. Weave in ends.

Wednesday, July 22, 2009

Aubrey Shawl Pattern

A simple lace shawl, worked from side to side. Pattern is written for fingering weight yarn but can also be used with other yarn weights. Use a needle several sizes larger than called for on the ball band.


Materials
Crystal Palace Yarns Mini Mochi (195 yd/skein), 2 skeins
Size 10.5 straight or circular needles
Tapestry needle
Coil-less safety pin or removable stitch marker (optional)

Gauge: not critical

Abbreviations
yo – yarn over
kfb – knit into front and back of stitch
k2tog – knit two together

Pattern Notes
This stitch pattern is based on garter stitch and will be very stretchy from side to side.

After a few rows have been completed, you may wish to place a coil-less safety pin or removable stitch marker to indicate the right side of the work. I usually place a colored elastic on the end of one of my needles – when I’m working with the marked needle, I’m on a right side row.

If possible, join new balls of yarn at the beginning of a WS row to facilitate weaving in of ends.

Pattern

Cast on 2.

Work increase section as follows:
Row 1 (RS): Knit to last stitch, kfb
Row 2 (WS): Knit
Row 3 (RS): *yo, k2tog* to last stitch, kfb
Row 4 (WS): Knit

Repeat these four rows 38 times or until shawl is half of desired width, ending with Row 4. (Note: If you are using two equally sized balls of yarn, do not wait until the first ball runs out to work the center rows. Give yourself some wiggle room and work the center before half of your yarn is gone.)

Work center rows one time:
Row 1 (RS): Knit
Row 2 (WS): Knit

Work decrease section as follows:
Row 1 (RS): *yo, k2tog* to last 2 stitches, k2tog
Row 2 (WS): Knit
Row 3 (RS): Knit to last 2 stitches, k2tog
Row 4 (WS): Knit

Repeat these four rows until 2 stitches remain. Knit last two stitches together. Break yarn and draw through last stitch. Weave in ends. Block, if desired, to even out triangular shape.

Tuesday, April 07, 2009

Seamless Spa Mitt

photo.jpg

What to do with those little balls of cotton left over from making dishcloths? This spa mitt only takes about one ounce of dishcloth cotton. I’ve made gift sets with a matching facecloth and spa mitt from a single skein. It is knit in the round on double-pointed needles and requires no seaming. It looks small as you’re making it, but the ribbing will stretch quite a bit. It should fit snugly enough not to fall off the hand when wet.

photo.jpg

Materials
Size 8 double-pointed needles, set of 4
Tapestry needle

Yarn: Sugar ‘n’ Cream cotton (about 1 oz, 30-40 yards)

Gauge: 5 stitches per inch in K2 , P2 ribbing, unstretched


Pattern
Cast on 28. Join to work in the round. Arrange stitches on three needles as follows:

Needle 1: 8
Needle 2: 8
Needle 3: 12

Work K2 , P2 ribbing across all stitches for 11 rounds.

At the end of the 11th round, when you have worked all of the stitches on Needle 3, turn the work. At this point you will back and forth on the dpns, which leaves a gap on one side for the thumbhole. Beginning with a WS row, work 9 rows of K2 , P2 ribbing across all 28 stitches. Remember to turn the work at the end of each row to work back and forth.

On the next row, which is a RS row, work K2 ,p2 ribbing across all 28 stitches. When you reach the end of Needle 3, join to work in the round again. Work K2 , P2 ribbing for 22 rounds or until desired length.

Finishing


Turn work inside out. Slip the first two stitches of Needle 2 to Needle 1. Slip remaining stitches from Needle 2 to Needle 3. You should have two needles with 14 stitches on each. Bind off all stitches using three needle bindoff. Break yarn. Weave in ends.

photo.jpg

Sunday, February 15, 2009

Waimanalo Sock Pattern


This sock is constructed from the top down with a short row heel and toe. The marine color palette and gentle wave pattern remind me of an evening in Waimanalo Bay. I need to get better photos - these are rainy day cell phone pictures.


Materials

Needles: Set of 4 doublepointed needles, size 1.5 (or size needed to obtain gauge)
Tapestry needle


Yarn: Misti International Hand Paint Fingering, colorway Marina, 1 skein (437 yards)
Gauge: 7 stitches per inch in stockinette stitch

Size: Women’s medium


Pattern notes

Wave pattern:
Row 1 and 2: Knit
Row 3: *K2tog 3 times, (yo, k1) 6 times, K2tog 3 times*, repeat from *
Row 4: Purl
Row 5: Knit
Row 6: Purl


Cuff

Using long tail cast on, cast on 54 stitches. Join to work in the round, taking care not to twist stitches. Arrange on three double-pointed needles as follows:

Needle 1: 18 stitches

Needle 2: 18 stitches

Needle 3: 18 stitches

Beginning with a knit row, knit 8 rounds of garter stitch (one row knit, one row purl). If a longer cuff is desired, add additional garter stitch rounds, ending with a purl row.


Leg

Work wave pattern 9 times or to desired length of leg, ending with row 2.

Heel
To set up for the heel, unknit the last four stitches of the previous round and place these unworked stitches on Needle 1. Next, slip the first four stitches on Needle 2 to Needle 1. The heel will be worked on the stitches on Needles 2 and 3.


Begin by unknitting the last stitch on Needle 3, and place on free needle. Wrap that stitch and turn the work.


Row 1 (WS): Purl to last stitch. Wrap and turn.

Row 2 (RS): Knit to stitch before wrapped stitch. Wrap and turn.

Row 3: Purl to stitch before wrapped stitch. Wrap and turn.

Repeat Rows 2 and 3 until there are 10 stitches unworked in the center of the row.

Row 4: Knit to first wrapped stitch. Wrap and turn. (This stitch will now have two wraps.)

Row 5: Purl to first wrapped stitch. Wrap and turn. (This stitch will now have two wraps.)

Row 6: Knit to double-wrapped stitch. Wrap and turn.

Row 7: Purl to double-wrapped stitch. Wrap and turn.

Continue in this manner until all stitches have been worked.

Foot

The wave lace pattern continues down the center of the instep. Each round of the foot is worked as follows:

Needle 1: K4, work next row of wave pattern (18 stitches), K4
Needle 2: Knit
Needle 3: Knit

Work 8 repeats of the wave pattern or until foot is 2 inches shorted than desired length, ending with Row 2.

Toe
Toe is worked on the stitches on Needles 2 and 3. Begin by unknitting the last stitch on Needle 3, and place on free needle. Wrap that stitch and turn the work.


Row 1 (WS): Purl to last stitch. Wrap and turn.

Row 2 (RS): Knit to stitch before wrapped stitch. Wrap and turn.

Row 3: Purl to stitch before wrapped stitch. Wrap and turn.

Repeat Rows 2 and 3 until there are 10 stitches unworked in the center of the row.

Row 4: Knit to first wrapped stitch. Wrap and turn. (This stitch will now have two wraps.)

Row 5: Purl to first wrapped stitch. Wrap and turn. (This stitch will now have two wraps.)

Row 6: Knit to double-wrapped stitch. Wrap and turn.

Row 7: Purl to double-wrapped stitch. Wrap and turn.

Continue in this manner until all stitches have been worked.


Finishing

Turn sock inside out. Slip stitches from Needle 3 to Needle 2. Use three needle bindoff to join stitches on needles 2 and 1. Break yarn. Weave in ends.

Thursday, September 25, 2008

Cabin Carry - Felted Bag Pattern


The slow color changes of this yarn and the log cabin construction technique contribute interest to the final look of this felted tote. The bag is constructed by knitting two log cabin squares from self-striping yarn and joining them together while creating the sides, bottom, and strap of the bag. There is no seaming and minimal finishing required.

Materials

Needle size: US 10½ / 6.5 mm (or size needed to obtain gauge)

Yarn: Noro Kureyon , colorway 150, 5 skeins (550 yards)

Tapestry Needle
Stitch markers
Safety pin or removable stitch marker

Gauge: 3.5 stitches per inch in garter stitch, prior to felting

Dimensions: about 18” by 16”, plus strap, prior to feltin

Front and Back (make 2)

Cast on 12. Knit 10 garter ridges (20 rows). *Bind off on right side, keeping last stitch on right needle. Rotate 90 degrees clockwise. With right side facing you, pick up one stitch for each garter ridge or bound off stitch. Knit 5 garter ridges.* Repeat from * 11 times, ending with 13 blocks total (center square surrounded by 12 additional blocks). Bind off all stitches on right side.

Strap and sides

At this point you will be joining the front and back pieces together while creating the sides and bottom of the bag. This is accomplished by picking up stitches from the front and back pieces at the end of each row of the side piece and knitting them together with the side stitches. This might be a little awkward for the first inch or two, but very soon the side of the bag will have enough structure to make it easier to handle. The sides of the bag widen slightly toward the bottom.

Setup row:
Arrange front and back pieces with wrong sides together. With right side facing, pick up one stitch in corner of front piece (as if you were going to begin another log cabin strip). Using backward loop method, cast on 2, place marker, cast on 1, place marker, cast on 3. Pick up one stitch from corner of back piece. Turn.

Side Row:
Knit first two stitches together (picked up stitch from previous row and first strap piece). Knit to end. Pick up one stitch from the next garter ridge or bound off stitch at the edge of the adjacent front/back piece.

Repeat side row 10 times.

Increase row: Knit first two stitches together (picked up stitch from previous row and first strap piece). Knit to stitch before first marker, kfb, k1, kfb. Knit to end. Pick up one stitch from the next garter ridge or bound off stitch at the edge of the adjacent front/back piece.

Repeat side row 15 times.
Repeat increase row.
Repeat side row 19 times.
Repeat increase row.
Repeat side row 19 times.
Repeat increase row. This is the last increase row. To mark the point on the opposite side of the body of the bag where decreases need to begin, trace a straight line across the work to the opposite edge and place a safety pin or removable marker at that spot.


Work side rows for the remainder of the side of the bag. When you reach the corner of the piece, just keep going - continue around the corner by picking up the first garter ridge/bound off stitch from the bottom edge. Continue side row for the bottom of the bag and second side of the piece until you reach your pin/removable marker.

Decrease row: Knit first two stitches together (picked up stitch from previous row and first strap piece). Knit to stitch before first marker, ssk, k1, k2tog. Knit to end. Pick up one stitch from the next garter ridge or bound off stitch at the edge of the adjacent front/back piece.

Repeat side row 19 times.
Repeat decrease row.
Repeat side row 19 times.
Repeat decrease row.
Repeat side row 15 times.
Repeat decrease row.

Work side row for the remainder of this side of the bag, which should be about 11 rows.

When you reach the top corner of the piece, knit back and forth on the remaining 7 stitches until strap is about 28 inches long. Bind off all stitches.

Finishing


Sew strap end to cast on row of side. Weave in ends. The felting process is pretty forgiving here, so don’t sweat imperfect finishing, but make sure that all ends are secure enough not to unravel during felting.

Felt. There are many, many felting tips and tutorials online. I usually toss my item in a pillowcase or laundry bag and put it through a short hot wash with a bit of detergent and a few pairs of jeans, checking it frequently and stopping before the spin cycle.

Block to the shape you want and allow to dry completely.

Thursday, July 24, 2008

Swim Lane Sock Pattern


It’s almost time for the Summer Olympics! Rings of reverse stockinette “float” between wider lanes of stockinette stitch along the leg of this sock. Pattern is written with five rings to echo the Olympic emblem and create a shorter summertime sock, but you could continue the leg pattern to any length. This sock is constructed from the top down with a ribbed cuff and heel flap and could easily be adapted to toe up if that is your preferred method.


Materials

Needles: Set of 4 doublepointed needles, size 2 (or size needed to obtain gauge)
Tapestry needle

Yarn: Any sock/fingering weight yarn will work for this pattern. Sample shown uses Collinette Jitterbug, 1 skein (about 320 yards)

Gauge: 7 stitches per inch in stockinette stitch

Size: Women’s medium

Cuff

Using long tail cast on, cast on 56 stitches. Join to work in the round, taking care not to twist stitches. Tail from cast on will serve as a marker for the beginning of the round. Arrange on three double-pointed needles as follows:


Needle 1: 14 stitches
Needle 2: 14 stitches
Needle 3: 28 stitches

Work K1, P1 ribbing for 10 rounds (or desired cuff length).


Leg

Swim Lane Sequence is worked over 6 rows.
Rows 1-4: Knit
Rows 5-6: Purl

Work Rows 1-6 five times (or to ½ inch shorter than desired length of leg). Work Rows 1-4 once more.


Heel

Heel flap is worked back and forth on the 28 stitches on Needle 3. The stitches on Needles 1 and 2 form the instep and will rest while the heel is fashioned.

Turn the work to begin working the heel on the wrong side of needle 3.

Row 1 (WS): Slip 1 purlwise with yarn in front, purl to end of row
Row 2 (RS): *Slip 1 purlwise with yarn in back, K1*, repeat to end of row

Repeat these two rows a total of 14 times. Repeat Row 1 once more.

Heel turn begins on the right side of the work and incorporates short rows to form the three-dimensional heel.
Row 1 (RS): Slip 1, K14, ssk, K1, turn.

Row 2 (WS): Slip 1, P3, P2tog, P1, turn.

Note the gap that is evident between the unworked stitches on the needle and the last worked stitch in the short rows.

Row 3 (RS): Slip 1, K to one stitch before the gap, ssk, K1, turn.

Row 4 (WS): Slip 1, P to one stitch before the gap, p2tog, p1, turn.

Repeat Rows 3 and 4 until all heel stitches have been worked. Knit across all stitches.

Gusset and Foot

Rearrange stitches as follows. Slip half of the heel stitches from Needle 1 to free needle. Slip instep stitches from Needle 3 to Needle 2. Needle 2 now has 28 stitches.

Beginning with Needle 1, which has half of the heel stitches, pick up 14 stitches along the heel flap. Work across Needle 2 in stockinette stitch. With a free needle, pick up 14 stitches along the heel flap and knit across the remaining heel stitches.

Needle 1 now holds half of the foot stitches, Needle 2 has the instep stitches, and Needle 3 holds the other half of the foot stitches. Beginning of round is at center bottom of foot.

Gusset Row 1: Knit to last three stitches on Needle 1, K2tog, K1. Knit across Needle 2. K1, ssk, knit to end of Needle 3.

Gusset Row 2: Work even.

Repeat these two rows until there are 14 stitches each on Needles 1 and 3.

Work even until foot is 1.5 inches shorter than desired length.

Toe

Toe Row 1: Knit to last three stitches on Needle 1, K2tog, K1. K1, ssk, knit to last 3 stitches on Needle 2, K2tog, K1. K1, ssk, knit to end of Needle 3.

Toe Row 2: Work even.

Repeat these two rows until there are 16 stitches remaining. Knit stitches on Needle 1 to bring yarn to side of toe for finishing.

Finishing

Slip stitches from Needle 3 to Needle 1. Use kitchener stitch to join toe stitches together. Break yarn. Weave in ends

OR
Turn sock inside out. Slip stitches from Needle 3 to Needle 1. Use three needle bindoff to join stitches on needles 1 and 2. Break yarn. Weave in ends.

Thursday, June 12, 2008

Violet Dress Pattern

photo.jpg

This seamless dress is worked from the top down, with garter stitch straps and hem, and decorative eyelet increases at the center front and back.

Size: 2T

Materials:
Berroco Comfort DK (50 grams,178 yards), 3 skeins (about 450 yards)
16” circular needle, size 8 (or size needed to obtain gauge)
24” circular needle, size 8 (or size needed to obtain gauge)
8 stitch markers


Gauge: 22 stitches = 4 inches in stockinette stitch

Pattern notes:
PM – place marker
Kfb – knit into front and back of next stitch
M1 – with the tip of your right needle, knit the bar in between the last stitch on your right needle and the first stitch on the left needle. This increases one stitch and leaves a decorative eyelet.
SlM – slip marker
K – Knit
BO – Bind off

Pattern:

Neck and straps are worked in the round, in garter stitch.
Cast on 80 stitches to shorter circular needle. Join to work in the round, placing marker to note beginning of round.

Round 1 and all odd rows: Purl
Round 2: Knit
Round 4: *K19, kfb*, repeat 3 times
Round 6: Knit
Round 8: K9, *kfb, k20* three times, kfb, K10
Round 10: Remove marker. BO 12, k32, BO 12, k32

You have divided the work to form the straps and have active stitches for the front and back pieces.

Front: At this point you will work back and forth. Turn the work to begin on a wrong side row.

Row 1 (WS): Purl across (32 stitches)
Row 2 (RS): K16, place marker, K16
Row 3: Purl
Row 4: Knit
Row 5: Purl
Row 6: Knit to one stitch before marker, M1, K1, SlM, K1, M1, knit to end of row
Row 7: Purl

Repeat Rows 6 and 7 nine times more. Do not bind off. Break yarn, leaving an 8 inch tail. Front stitches will rest while back is worked.

Back: Attach yarn to the WS side of the back piece and work as for front. Do not break yarn.

At this point you will rejoin the pieces as follows: On the next right side row, knit across back stitches, PM to mark underarm, then knit across the resting front stitches. PM to denote beginning of round, and join underarm by knitting the next stitch.

The rest of the piece will be worked in the round. Work in stockinette stitch, knitting every round, until piece measures 2 inches from underarm or desired length of bodice.

Skirt: At this point you should have markers in the center of the front and back, and at the center of each underarm. Place additional markers to note skirt increase points at the center point in between the existing markers as follows. *SlM, k13, PM, knit to next marker*, repeat to end of round.

You should end up with 8 equidistant markers around the skirt. You will be increasing before and after each marker.

Round 1: SlM, *kfb, knit to last stitch before marker, kfb, SlM*, repeat to end of round
Round 2-6: Knit

Repeat rounds 1-6 eight times more, switching to longer circular needle when required to hold larger number of stitches. At this point, you can remove increase point and center point markers if desired, leaving beginning of round marker in place. Continue in stockinette stitch until skirt is 11 inches from beginning of increase round, or 1 inch shorted than desired length.

Work garter stitch hem as follows:

Round 1,3,5,7,9: Purl
Round 2,4,6,8: Knit
Round 10: Bind off all stitches.

Finishing: Break yarn. Weave in ends. Block if desired.

photo.jpg

Sunday, May 04, 2008

Jury Duty Sock Pattern

photo.jpg


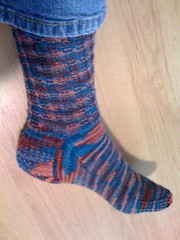
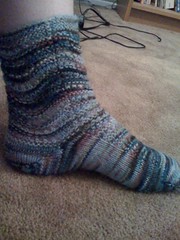
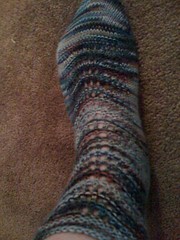
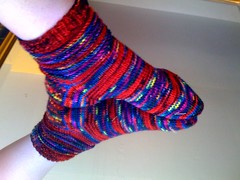
This sock is constructed from the top down with a ribbed cuff and heel flap. Pillars of knit stitches are set against a background of reverse stockinette on the leg, and the foot is simple, speedy stockinette. It was designed to be very easy to pick and up put down during the unpredictable breaks in my jury duty service without needing to refer to a pattern. Also, the inexpensive price of Knit Picks Essential will let you buy yarn for a pair of these socks with even a meager jury duty reimbursement.

Materials


Needles: Set of 4 doublepointed needles, size 2 (or size needed to obtain gauge - I am a pretty tight knitter, so you may get a better fitting sock on a size 1 needle)
Tapestry needle

Yarn: Any sock/fingering weight yarn will work for this pattern. Sample shown uses Knit Picks Essential Multi, 2 skeins (about 340 yards)

Gauge: 7 stitches per inch in stockinette stitch (for a comfy leg - try 7.5 stitches to the inch for a snugger fit)

Size: Women’s medium

Cuff

Using long tail cast on, cast on 64 stitches. Join to work in the round, taking care not to twist stitches. Tail from cast on will serve as a marker for the beginning of the round. Arrange on three double-pointed needles as follows:

Needle 1: 16 stitches
Needle 2: 16 stitches
Needle 3: 32 stitches

Work K1, P1 ribbing for 12 rounds (or desired cuff length).

Leg

*K1, P3*, repeat to end of round. Repeat this row until leg measures 6 3/4 inches from cast-on cuff edge or desired length of leg.
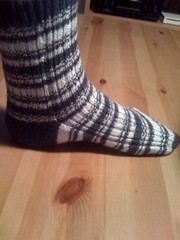

Heel

Heel flap is worked back and forth on the 32 stitches on Needle 3. The stitches on Needles 1 and 2 form the instep and will rest while the heel is fashioned.

Turn the work to begin working the heel on the wrong side of needle 3.

Row 1 (WS): Slip 1 purlwise with yarn in front, purl to end of row
Row 2 (RS): *Slip 1 purlwise with yarn in back, K1*, repeat to end of row

Repeat these two rows 15 times. Repeat Row 1 once more.

Heel turn begins on the right side of the work and incorporates short rows to form the three-dimensional heel.
Row 1 (RS): Slip 1, K16, ssk, K1, turn.

Row 2 (WS): Slip 1, P3, P2tog, P1, turn.

Note the gap that is evident between the unworked stitches on the needle and the last worked stitch in the short rows.

Row 3 (RS): Slip 1, K to one stitch before the gap, ssk, K1, turn.

Row 4 (WS): Slip 1, P to one stitch before the gap, p2tog, p1, turn.

Repeat Rows 3 and 4 until all heel stitches have been worked. Knit across all stitches.

Gusset and Foot

Rearrange stitches as follows. Slip half of the heel stitches from Needle 1 to free needle. Slip instep stitches from Needle 3 to Needle 2. Needle 2 now has 32 stitches.

Beginning with Needle 1, which has half of the heel stitches, pick up 16 stitches along the heel flap. Work across Needle 2 in stockinette stitch. With a free needle, pick up 16 stitches along the heel flap and knit across the remaining heel stitches.

Needle 1 now holds half of the foot stitches, Needle 2 has the instep stitches, and Needle 3 holds the other half of the foot stitches. Beginning of round is at center bottom of foot.

Gusset Row 1: Knit to last three stitches on Needle 1, K2tog, K1. Knit across Needle 2. K1, ssk, knit to end of Needle 3.

Gusset Row 2: Work even.

Repeat these two rows until there are 16 stitches on Needles 1 and 3.

Work even until foot is 2 inches shorter than desired length.

Toe

Toe Row 1: Knit to last three stitches on Needle 1, K2tog, K1. K1, ssk, knit to last 3 stitches on Needle 2, K2tog, K1. K1, ssk, knit to end of Needle 3.

Toe Row 2: Work even.

Repeat these two rows until there are 24 stitches remaining. Knit stitches on Needle 1 to bring yarn to side of toe for finishing.

Finishing

Slip stitches from Needle 3 to Needle 1. Use kitchener stitch to join toe stitches together. Break yarn. Weave in ends

OR
Turn sock inside out. Slip stitches from Needle 3 to Needle 1. Use three needle bindoff to join stitches on needles 1 and 2. Break yarn. Weave in ends.

photo.jpg

Friday, April 11, 2008

Ribonacci Sock Pattern


This sock is constructed from the top down with a short row heel and toe. The ribbing and stripe pattern are inspired by the Fibonacci sequence. The cuff, heel and toe are worked in a main color, and the contrast color is paired with the main color for the striped leg and foot.


Materials


Needles: Set of 4 doublepointed needles, size 2 (or size needed to obtain gauge

Tapestry needle


Yarn: Any sock/fingering weight yarn will work for this pattern. Sample shown uses Schachenmayr Nomotta Micro Bamboo. Solid colors show off the stripe pattern best, but you could experiment with a solid main color and a contrast color in a complementary variegated colorway.

Main color (MC): 2 skeins (about 300 yards)

Contrasting color (CC): 1 skein (about 200 yards)


Gauge: 8 stitches per inch in Rib pattern


Size: Women’s medium


Pattern notes

Rib pattern, over 8 stitches: *K1, P1, K2, P1, K1, P2*


Stripe sequence, over 24 rows:

Row 1: CC

Row 2: MC

Rows 3-4: CC

Rows 5-7: MC

Row 8-12: CC

Row 13: MC

Row 14: CC

Rows 15-16: MC

Rows 17-19: CC

Rows 20-24: MC


Cuff

Using long tail cast on and MC, cast on 64 stitches. Join to work in the round, taking care not to twist stitches. Arrange on three double-pointed needles as follows:

Needle 1: 16 stitches

Needle 2: 16 stitches

Needle 3: 32 stitches


Work K1, P1 ribbing for 12 rounds (or desired cuff length).


Leg

Leg is worked in the rib pattern (*K1, P1, K2, P1, K1, P2*, repeat to end of round) and stripe sequence (see above). Note that stripe sequence begins with CC. When changing colors, bring the new color up from beneath the current color. Hold the color not in use behind the work. To neaten floats, wrap unused color around the active color on rows 6, 10, 18, and 22. Work rows 1-24 of stripe sequence twice. Work rows 1-6 of stripe sequence once more.


Heel

Heel is worked on the 32 stitches on Needle 3, using MC. The stitches on Needles 1 and 2 form the instep and will rest while the heel is fashioned. The contract color also rests during this time.


Begin by unknitting the last stitch on Needle 3, and place on free needle. Turn the work.


Row 1 (WS): P30, turn.

Row 2 (RS): K29, turn.

Row 3: P28, turn.

Row 4: K27, turn.

Row 5: P26, turn.

Continue in this manner, working one fewer stitch each row, until there are 14 stitches unworked in the center of the needle.

Next Row (RS): K14, slip 1, yarn forward, place slipped stitch back on left needle and turn.

Next Row (WS): P14, slip 1, yarn back, place slipped stitch back on left needle and turn.

Next Row: K15, wrap and turn.

Next Row: P16, wrap and turn.

Continue in this manner until all stitches have been worked.


Foot

Resume the stripe sequence for the foot and continue in pattern as set (rib pattern for instep stitches and stockinette for bottom of foot). Work rows 7-24 of the stripe sequence, then work rows 1-24 of the stripe sequence. Work rows 1-12 of stripe sequence once more. Break yarn of CC ONLY – main color is used for toe.


Toe


Toe is worked on the 32 stitches on Needle 3, using MC. The stitches on Needles 1 and 2 will rest while the heel is fashioned.


Begin by unknitting the last stitch on Needle 3, and place on free needle. Turn the work.


Row 1 (WS): P30, turn.

Row 2 (RS): K29, turn.

Row 3: P28, turn.

Row 4: K27, turn.

Row 5: P26, turn.

Continue in this manner, working one fewer stitch each row, until there are 14 stitches unworked in the center of the needle.

Next Row (RS): K14, slip 1, yarn forward, place slipped stitch back on left needle and turn.

Next Row (WS): P14, slip 1, yarn back, place slipped stitch back on left needle and turn.

Next Row: K15, wrap and turn.

Next Row: P16, wrap and turn.

Continue in this manner until all stitches have been worked.


Finishing


Turn sock inside out. Slip stitches from Needle 2 to Needle 1. Use three needle bindoff and MC to join stitches on needles 3 and 1. Break yarn. Weave in ends.


Variations

Make symmetrical socks by reversing the rib pattern for the second sock as follows: *P2, K1, P1, K2, P1, K1*


Make “negative image” socks and use only two skeins of yarn by reversing the MC and CC for the second sock.

Monday, March 31, 2008

One Hour Bib


A very last minute baby gift. Actual time elapsed depends on your personal knitting speed.

Materials

Size 11 needles

Lily Sugar ‘n’ Cream yarn, 1 skein (120 yds) – held double throughout

Tapestry needle

Gauge in garter stitch – 3.5 stitches per inch. Exact gauge is not essential

Pattern

Using long tail cast on and holding two strands of yarn together throughout, cast on 24 stitches. Knit all stitches in every row until piece measures 8.5 inches.

On the following right side row (tail from long tail cast on will be on the right-hand side of the piece, bind off all stitches, but leave last stitch on the needle. Do not break yarn.

Keeping the right side facing you, rotate the work 90 degrees to the right, so that the active stitch is now in the upper right corner of the piece. Pick up one stitch for each garter ridge along this edge.
Knit three rows even.

On the following right side row, K3, bind off to last three stitches, K3. Knit back and forth on three active stitches until strap measures 10 inches. Bind off. Break yarn. Join yarn to wrong side of the three remaining stitches. Work even until second strap measures 10 inches. Bind off. Break yarn. Weave in ends.

Wednesday, February 06, 2008

Heartstrings Hat Pattern

A sweet, simple hat for the little Valentine in your life. I started with one a basic hat recipe (I like the ones in Susan Anderson's Itty Bitty Hats) and embellished with hearts from I-cords knitted out from the top of the hat.


Size: Toddler (about 1-2 years)

Yarn:
MC: 120 yards worsted weight yarn (1 skein Lily Sugar ‘n’ Cream Solid Cotton: Pink)

CC: 40 yards worsted weight yarn (1 skein Lily Sugar ‘n’ Cream Solid Cotton: Pink and white variegated))


Materials:)

Size 6 16” cicular needle)

Size 6 double-pointed needles, set of 5)

Stitch marker)


Gauge: 5 stitches per inch in stockinette stitch

Pattern:

With MC, cast on 80.

Join for knitting in the round.

Place a stitch marker to denote beginning of round.

Knit every round until body of hat measures 6.25” from bottom edge (unroll as needed to measure)


Decrease for crown of hat as follows, switching to dpn’s as needed to accommodate smaller number of stitches.

Round 1: *K6, k2tog*, repeat to end of round

Round 2:*K5, k2tog*, repeat to end of round

Round 3:Knit

Round 4:Knit

Round 5:*K4, k2tog*, repeat to end of round

Round 6:Knit

Round 7:*K3, k2tog*, repeat to end of round

Round 8:Knit

Round 9:*K2, k2tog*, repeat to end of round

Round 10:Knit

Round 11:*K1, k2tog*, repeat to end of round

Round 12:*K2tog*, repeat to end of round


You should have 10 stitches remaining. Arrange stitches as follows on 4 double-pointed needles:

Needle 1: 2 stitches

Needle 2: 3 stitches

Needle 3: 2 stitches

Needle 4: 3 stitches


You will now be working with the contrasting color (CC) to make the cords that will form the top of the hat and the applied heart designs,
To make I-cord: On every row, *k to end, do not turn work, slide stitches to other side of needle*, repeat until cord is desired length

With CC:
Needle 1: Work 2 stitch I-cord for 16”. SSK. Fasten off remaining stitch and break yarn, leaving a 12” tail.

Needle 2: Work 3 stitch I-cord for 16”. Slip 1, SSK, pass slipped stitch over. Fasten off remaining stitch and break yarn, leaving a 12” tail.

Needle 3: Work 2 stitch I-cord for 16”. SSK. Fasten off remaining stitch and break yarn, leaving a 12” tail.

Needle 4: Work 3 stitch I-cord for 16”. Slip 1, SSK, pass slipped stitch over SSK. Fasten off remaining stitch and break yarn, leaving a 12” tail.

Finishing:

Tie together the two 2-stitch cords in a loose knot to close the opening at the top of the hat. Tie together the two 3-stitch cords over the top of the first knot. Don’t pull these tight and deform the shape of the hat.

Lay each cord out in a heart shape on the outside of the hat, and use the long tail at the end of each cord to attach to the body of the hat. I found it easiest to tack down the point at the bottom of the heart, then the indentation at the top, and then a few points around the perimeter of the shape.

Weave in all ends.


IMG_2023.JPG
Originally uploaded by gldyas

Sunday, October 14, 2007

Perpendicular Hat Pattern


This comfy, casual hat begins with a simple strip of garter stitch. This becomes the brim of the hat when joined into a circle. Stitches are picked up from the brim and worked upward for the body and crown of the hat.

Materials

Noro Silk Garden (45% Silk, 45% kid mohair, 10% lamb's wool; 100m/122yds per 50g skein); color: 249, 2 skeins

A: Skein #1
B: Skein #2

1 16” circular US 7/4.5 mm needle or size needed to obtain gauge
Set of 4 circular US 7/4.5 mm double-pointed needles or size needed to obtain gauge
Stitch marker
Scrap yarn (for provisional cast on)
Tapestry needle

Gauge
5 stitches per inch in stockinette stitch
4 stitches per inch in garter stitch

Finished Measurements
Circumference: 21 inches
Height: 8.5 inches

If possible, measure the head circumference of the intended receipient.

Pattern
Throughout the pattern, you will be working with two balls of yarn at the same time, alternating between balls every two rows. Even if the balls are the same colorway, starting each ball at a different point in the color sequence creates a striped effect. For a subtler stripe, wind balls to begin at a similar point in the sequence. For a more striking effect, choose two complementary or contrasting colorways and use one ball from each.

When changing yarns, bring the new yarn up from under the working yarn to maintain a neat edge.


Brim
The garter stitch brim strip is worked back and forth on two of the double-pointed needles.

With provisional cast on and A, cast on 12 stitches, leaving a 12” tail. The tail will be used for joining the garter strip into a circular brim.

Row 1(WS): With A, knit across.
Row 2(RS): With B, knit.
Row 3(WS): With B, knit.
Row 4(RS): With A, knit
Row 5(WS): With A, knit.

Repeat rows 2-5 until you have 72 garter ridges and piece is about 20 inches long (or equal to desired head circumference), ending with Row 3. Do not bind off.

Unzip provisional cast on and place stitches on another double-pointed needle. Thread tail from cast-on on to a tapestry needle.

Hold the needle holding the last worked stitches and the needle holding the unzipped stitches parallel, forming the brim into a circle. Using the tapestry needle, graft the stitches on each needle together using kitchener stitch. (Note: The graft-avoidant can use a three-needle bindoff instead.)

Body

Hold brim with RS facing. With A and circular needle, pick up one stitch between each of the garter stitch ridges on one edge. You should end up with a number of stitches equal to the number of garter ridges. Place marker to note beginning of round.

Round 1: With A, knit into front and back of each stitch.
Round 2: With B, knit.
Round 3: With B, knit.
Round 4: With A, knit.
Round 5: With A, knit.

Repeat rounds 2-5 until hat measures 8 inches from bottom edge of brim.

Crown

Begin decrease rounds for crown of hat, switching to double-pointed needles when stitches no longer fit comfortably on the circles. AT THE SAME TIME, maintain the two-row color pattern. (Decrease pattern assumes that you have a multiple of 8 stitches. If that is not the case, work a setup row before the decrease sequence to arrive at a multiple of 8, decreasing evenly around the body of the hat.)

Row 1: *K6, K2tog *, repeat to end of round
Row 2: Knit
Row 3: *K5, K2tog *, repeat to end of round
Row 4: Knit
Row 5: *K4, K2tog *, repeat to end of round
Row 6: Knit
Row 7: *K3, K2tog *, repeat to end of round
Row 8: * K2 , K2tog *, repeat to end of round
Row 9: *K1, K2tog *, repeat to end of round
Row 10: *K2tog*, repeat to end of round

Finishing
Cut yarn, leaving a 6” tail. Thread yarn on to tapestry needle and pull through remaining stitches to inside of hat. Weave in all ends.

Tuesday, July 03, 2007

Limeade Bib and Dishcloth Patterns

It was really hot today, and the color of this yarn made me think of cool summertime beverages. I made a bib, but I think the stripes of stockinette and reverse stockinette created by the odd number of rows in the pattern would also be great for a scrubby kitchen cloth, and I’ve included instructions for a dishcloth variation.


Materials:
1 skein Sugar ‘n’ Cream cotton – Hot Green
Size 8 straight or circular needles
One 3/8 inch button (bib only)
Two stitch markers (optional)
Tapestry needle

Instructions:
Seed stitch (over an odd number of stitches): *K1, P1*, repeat to end of row.
When you turn the work to the other side, the pattern remains the same. You will be knitting the purl stitches and purling the knit stitches from the previous row to create the seed stitch pattern.

Seed Border (SB): K1, P1, K1, P1, K1

Limeade Bib

Cast on 33 stitches.
Work 3 rows seed stitch.
Row 4: Work 5 stitches seed stitch, place marker, work seed stitch until 5 stitches remain on left needle, place marker, work last 5 stitches in seed stitch. The markers separate the border stitches from the body of the bib. If you’re comfortable with keeping track of 5 stitches on either side as you work, you can omit the markers.

Row 5: SB to marker, knit to second marker, SB to end of row
Row 6: SB to marker, purl to second marker, SB to end of row
Row 7: SB to marker, knit to second marker, SB to end of row

Repeat rows 5-7 twelve times.

Work 4 rows seed stitch.
For straps, work seed stitch to first marker, remove marker, work two more stitches seed stitch. Bind off, in pattern, until two stitches before second marker. Work two stitches in seed stitch, remove marker, and work remaining stitches in seed stitch.

Work straps separately.

Strap A: Work in seed stitch until strap measures 5 inches. Bind off in pattern.
Strap B: Work in seed stitch until strap measures 4.5 inches.
Create buttonhole – Work 3 in seed stitch, bind off 2, work 2 in seed stitch. On next row, work 3, cast on 2, work 2
Work in seed stitch until strap measures 5 inches. Bind off in pattern.

Sew on button. Weave in ends.

Limeade Dishcloth Variation

Cast on 45 stitches.
Work rows 1-4 as for bib.
Work rows 5-7, as for bib.
Repeat rows 5-7 eighteen times.
Work 4 rows seed stitch.
Bind off in pattern.
Weave in ends.

Saturday, June 30, 2007

Red, White, and Bib - Flag Bib Pattern

Perfect for a summer picnic, a Yankee Doodle baby born on the Fourth of July, or being kissed by politicians any time of year. The garter stitch baby bib pattern in Mason-Dixon Knitting inspired the basic structure of this bib.


Materials:
Sugar ‘n’ Cream cotton, 1 partial skein each of Red, White, and Bright Navy.
1 ¾ inch button – sample in photo uses a red star
Tapestry needle
Size 8 straight needles

Gauge: 4.5 stitches and 8 rows per inch in garter stitch

Instructions:

You will be joining new colors when working the public side of the piece. When working stripes, carry the color not in use up the back of the work, wrapping around the active color on the wrong side. Bring the new color up from under the previous color when changing yarns.

With Red, cast on 33 stitches.

Stripes:
Rows 1-8: Knit with Red
Rows 9-16: Knit with White
Rows 17-24: Knit with Red
Rows 25-32: Knit with White

Add field for stars, and continue stripe pattern

Row 33: K20 with Red. Join Bright Navy and knit 13.
Row 34, 36, 38, 40: K13 with Bright Navy, K20 with Red
Row 35, 37, 39: K20 with Red, K13 with Bright Navy
Row 41, 43, 45, 47: K20 with White, K13 with Bright Navy
Row 42, 44, 46, 48: K13 with Bright Navy, K20 with White
Rows 49-56: Repeat rows 33-40.

Begin straps.

Row 57: Knit 8 with White. With Red, bind off the next 12 stitches. With Bright Navy, bind off 5 stitches, then knit to end.

Buttonhole strap:
With Bright Navy, knit these 8 stitches back and forth for 30 rows.
Create buttonhole: Knit 3, bind off 2, knit 3. On next row, knit 3, cast on 3, knit 3.
Work 4 more rows with Bright Navy.
Bind off all stitches.

Button strap:
Return to the 8 active white stitches on the other side of the work.
With White, knit 29 rows.
Bind off all stitches.
Sew button on to right side of this strap.

Embroider stars on to the field of Bright Navy with a length of White threaded on to a tapestry needle. Each star is composed of five short straight stitches radiating from a central point: one vertical, two horizontal, and two angled down and out from the center point.

Weave in all ends.