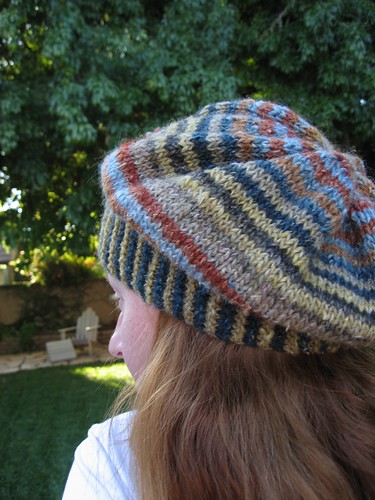
This comfy, casual hat begins with a simple strip of garter stitch. This becomes the brim of the hat when joined into a circle. Stitches are picked up from the brim and worked upward for the body and crown of the hat.
Materials
Noro Silk Garden (45% Silk, 45% kid mohair, 10% lamb's wool; 100m/122yds per 50g skein); color: 249, 2 skeins
A: Skein #1
B: Skein #2
1 16” circular US 7/4.5 mm needle or size needed to obtain gauge
Set of 4 circular US 7/4.5 mm double-pointed needles or size needed to obtain gauge
Stitch marker
Scrap yarn (for provisional cast on)
Tapestry needle
Gauge
5 stitches per inch in stockinette stitch
4 stitches per inch in garter stitch
Finished Measurements
Circumference: 21 inches
Height: 8.5 inches
If possible, measure the head circumference of the intended receipient.
Pattern
Throughout the pattern, you will be working with two balls of yarn at the same time, alternating between balls every two rows. Even if the balls are the same colorway, starting each ball at a different point in the color sequence creates a striped effect. For a subtler stripe, wind balls to begin at a similar point in the sequence. For a more striking effect, choose two complementary or contrasting colorways and use one ball from each.
When changing yarns, bring the new yarn up from under the working yarn to maintain a neat edge.
Brim
The garter stitch brim strip is worked back and forth on two of the double-pointed needles.
With provisional cast on and A, cast on 12 stitches, leaving a 12” tail. The tail will be used for joining the garter strip into a circular brim.
Row 1(WS): With A, knit across.
Row 2(RS): With B, knit.
Row 3(WS): With B, knit.
Row 4(RS): With A, knit
Row 5(WS): With A, knit.
Repeat rows 2-5 until you have 72 garter ridges and piece is about 20 inches long (or equal to desired head circumference), ending with Row 3. Do not bind off.
Unzip provisional cast on and place stitches on another double-pointed needle. Thread tail from cast-on on to a tapestry needle.
Hold the needle holding the last worked stitches and the needle holding the unzipped stitches parallel, forming the brim into a circle. Using the tapestry needle, graft the stitches on each needle together using kitchener stitch. (Note: The graft-avoidant can use a three-needle bindoff instead.)
Body
Hold brim with RS facing. With A and circular needle, pick up one stitch between each of the garter stitch ridges on one edge. You should end up with a number of stitches equal to the number of garter ridges. Place marker to note beginning of round.
Round 1: With A, knit into front and back of each stitch.
Round 2: With B, knit.
Round 3: With B, knit.
Round 4: With A, knit.
Round 5: With A, knit.
Repeat rounds 2-5 until hat measures 8 inches from bottom edge of brim.
Crown
Begin decrease rounds for crown of hat, switching to double-pointed needles when stitches no longer fit comfortably on the circles. AT THE SAME TIME, maintain the two-row color pattern. (Decrease pattern assumes that you have a multiple of 8 stitches. If that is not the case, work a setup row before the decrease sequence to arrive at a multiple of 8, decreasing evenly around the body of the hat.)
Row 1: *K6, K2tog *, repeat to end of round
Row 2: Knit
Row 3: *K5, K2tog *, repeat to end of round
Row 4: Knit
Row 5: *K4, K2tog *, repeat to end of round
Row 6: Knit
Row 7: *K3, K2tog *, repeat to end of round
Row 8: * K2 , K2tog *, repeat to end of round
Row 9: *K1, K2tog *, repeat to end of round
Row 10: *K2tog*, repeat to end of round
Finishing
Cut yarn, leaving a 6” tail. Thread yarn on to tapestry needle and pull through remaining stitches to inside of hat. Weave in all ends.