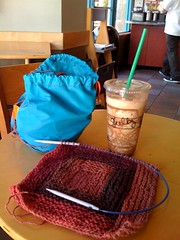
And so do I. Iced and blended, considering it will top 100 again today. Blergh. This afternoon I will take advantage of the air conditioning at the theater when I take Pumpkin to see Kung Fu Panda. I will be bringing the other half of the pictured WIP (a bag I am designing) to the movies.
Tonight at 9:01(12:01 Eastern), the Summer of Socks begins! I'm getting my ball winder out right now to get some yarn cakes ready. I'm planning some purless Monkeys for my first pair.
Friday, June 20, 2008


Wednesday, June 18, 2008
Ah, vacation
Today is the first day of a mini-sabbatical - I am off work until July 14th. Since there wasn't much chance to take time off over the last few years, I have a bit of a surplus of paid time off. I am tacking on a bit of time before and after the corporate week-long holiday to enjoy a nice long break. More crazy work times are coming up, and I really like my job, but for the next three and a half weeks I am gleefully out of the office.
Pictured WIP: Seamless Saarjte's Booties
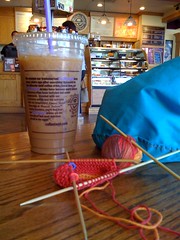
Pictured WIP: Seamless Saarjte's Booties
Thursday, June 12, 2008
Violet Dress Pattern
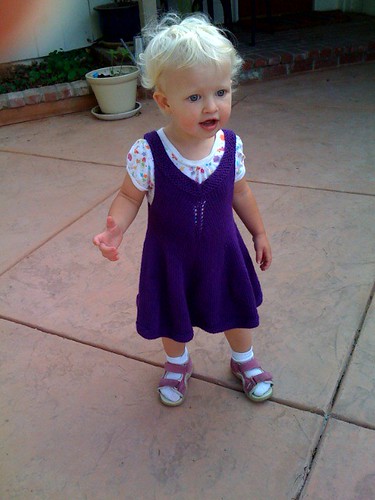
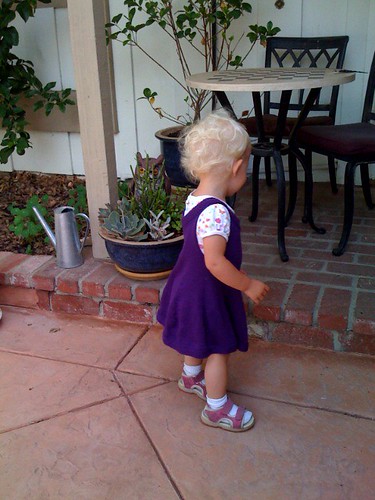
This seamless dress is worked from the top down, with garter stitch straps and hem, and decorative eyelet increases at the center front and back.
Size: 2T
Materials:
Berroco Comfort DK (50 grams,178 yards), 3 skeins (about 450 yards)
16” circular needle, size 8 (or size needed to obtain gauge)
24” circular needle, size 8 (or size needed to obtain gauge)
8 stitch markers
Gauge: 22 stitches = 4 inches in stockinette stitch
Pattern notes:
PM – place marker
Kfb – knit into front and back of next stitch
M1 – with the tip of your right needle, knit the bar in between the last stitch on your right needle and the first stitch on the left needle. This increases one stitch and leaves a decorative eyelet.
SlM – slip marker
K – Knit
BO – Bind off
Pattern:
Neck and straps are worked in the round, in garter stitch.
Cast on 80 stitches to shorter circular needle. Join to work in the round, placing marker to note beginning of round.
Round 1 and all odd rows: Purl
Round 2: Knit
Round 4: *K19, kfb*, repeat 3 times
Round 6: Knit
Round 8: K9, *kfb, k20* three times, kfb, K10
Round 10: Remove marker. BO 12, k32, BO 12, k32
You have divided the work to form the straps and have active stitches for the front and back pieces.
Front: At this point you will work back and forth. Turn the work to begin on a wrong side row.
Row 1 (WS): Purl across (32 stitches)
Row 2 (RS): K16, place marker, K16
Row 3: Purl
Row 4: Knit
Row 5: Purl
Row 6: Knit to one stitch before marker, M1, K1, SlM, K1, M1, knit to end of row
Row 7: Purl
Repeat Rows 6 and 7 nine times more. Do not bind off. Break yarn, leaving an 8 inch tail. Front stitches will rest while back is worked.
Back: Attach yarn to the WS side of the back piece and work as for front. Do not break yarn.
At this point you will rejoin the pieces as follows: On the next right side row, knit across back stitches, PM to mark underarm, then knit across the resting front stitches. PM to denote beginning of round, and join underarm by knitting the next stitch.
The rest of the piece will be worked in the round. Work in stockinette stitch, knitting every round, until piece measures 2 inches from underarm or desired length of bodice.
Skirt: At this point you should have markers in the center of the front and back, and at the center of each underarm. Place additional markers to note skirt increase points at the center point in between the existing markers as follows. *SlM, k13, PM, knit to next marker*, repeat to end of round.
You should end up with 8 equidistant markers around the skirt. You will be increasing before and after each marker.
Round 1: SlM, *kfb, knit to last stitch before marker, kfb, SlM*, repeat to end of round
Round 2-6: Knit
Repeat rounds 1-6 eight times more, switching to longer circular needle when required to hold larger number of stitches. At this point, you can remove increase point and center point markers if desired, leaving beginning of round marker in place. Continue in stockinette stitch until skirt is 11 inches from beginning of increase round, or 1 inch shorted than desired length.
Work garter stitch hem as follows:
Round 1,3,5,7,9: Purl
Round 2,4,6,8: Knit
Round 10: Bind off all stitches.
Finishing: Break yarn. Weave in ends. Block if desired.
Wednesday, May 21, 2008
Ow
I am on a forced hiatus from knitting due to tendinitis in both arms, primarily the right, from overuse. I am calling it an anti-stress stress injury; since I had a lull in my need to do work in the evenings, I filled that time with knitting. Since I can't stop typing and don't want to stop picking up and carrying the young one, a break from knitting is my best choice for resting my arm.
Friday, May 09, 2008

Sunday, May 04, 2008
Jury Duty Sock Pattern
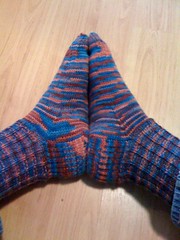
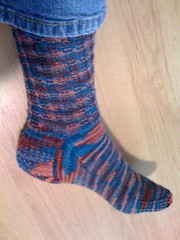
This sock is constructed from the top down with a ribbed cuff and heel flap. Pillars of knit stitches are set against a background of reverse stockinette on the leg, and the foot is simple, speedy stockinette. It was designed to be very easy to pick and up put down during the unpredictable breaks in my jury duty service without needing to refer to a pattern. Also, the inexpensive price of Knit Picks Essential will let you buy yarn for a pair of these socks with even a meager jury duty reimbursement.
Materials
Needles: Set of 4 doublepointed needles, size 2 (or size needed to obtain gauge - I am a pretty tight knitter, so you may get a better fitting sock on a size 1 needle)
Tapestry needle
Yarn: Any sock/fingering weight yarn will work for this pattern. Sample shown uses Knit Picks Essential Multi, 2 skeins (about 340 yards)
Gauge: 7 stitches per inch in stockinette stitch (for a comfy leg - try 7.5 stitches to the inch for a snugger fit)
Size: Women’s medium
Cuff
Using long tail cast on, cast on 64 stitches. Join to work in the round, taking care not to twist stitches. Tail from cast on will serve as a marker for the beginning of the round. Arrange on three double-pointed needles as follows:
Needle 1: 16 stitches
Needle 2: 16 stitches
Needle 3: 32 stitches
Work K1, P1 ribbing for 12 rounds (or desired cuff length).
Leg
*K1, P3*, repeat to end of round. Repeat this row until leg measures 6 3/4 inches from cast-on cuff edge or desired length of leg.
Heel
Heel flap is worked back and forth on the 32 stitches on Needle 3. The stitches on Needles 1 and 2 form the instep and will rest while the heel is fashioned.
Turn the work to begin working the heel on the wrong side of needle 3.
Row 1 (WS): Slip 1 purlwise with yarn in front, purl to end of row
Row 2 (RS): *Slip 1 purlwise with yarn in back, K1*, repeat to end of row
Repeat these two rows 15 times. Repeat Row 1 once more.
Heel turn begins on the right side of the work and incorporates short rows to form the three-dimensional heel.
Row 1 (RS): Slip 1, K16, ssk, K1, turn.
Row 2 (WS): Slip 1, P3, P2tog, P1, turn.
Note the gap that is evident between the unworked stitches on the needle and the last worked stitch in the short rows.
Row 3 (RS): Slip 1, K to one stitch before the gap, ssk, K1, turn.
Row 4 (WS): Slip 1, P to one stitch before the gap, p2tog, p1, turn.
Repeat Rows 3 and 4 until all heel stitches have been worked. Knit across all stitches.
Gusset and Foot
Rearrange stitches as follows. Slip half of the heel stitches from Needle 1 to free needle. Slip instep stitches from Needle 3 to Needle 2. Needle 2 now has 32 stitches.
Beginning with Needle 1, which has half of the heel stitches, pick up 16 stitches along the heel flap. Work across Needle 2 in stockinette stitch. With a free needle, pick up 16 stitches along the heel flap and knit across the remaining heel stitches.
Needle 1 now holds half of the foot stitches, Needle 2 has the instep stitches, and Needle 3 holds the other half of the foot stitches. Beginning of round is at center bottom of foot.
Gusset Row 1: Knit to last three stitches on Needle 1, K2tog, K1. Knit across Needle 2. K1, ssk, knit to end of Needle 3.
Gusset Row 2: Work even.
Repeat these two rows until there are 16 stitches on Needles 1 and 3.
Work even until foot is 2 inches shorter than desired length.
Toe
Toe Row 1: Knit to last three stitches on Needle 1, K2tog, K1. K1, ssk, knit to last 3 stitches on Needle 2, K2tog, K1. K1, ssk, knit to end of Needle 3.
Toe Row 2: Work even.
Repeat these two rows until there are 24 stitches remaining. Knit stitches on Needle 1 to bring yarn to side of toe for finishing.
Finishing
Slip stitches from Needle 3 to Needle 1. Use kitchener stitch to join toe stitches together. Break yarn. Weave in ends
OR
Turn sock inside out. Slip stitches from Needle 3 to Needle 1. Use three needle bindoff to join stitches on needles 1 and 2. Break yarn. Weave in ends.
Tuesday, April 15, 2008
Dizzy....Scarf?
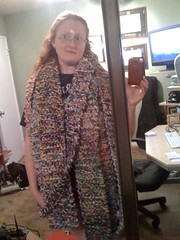
I finished knitting my scrap rug last night, but still need to sew it together. I don't think the 22-foot scarf is a good look for me.
Friday, April 11, 2008
Ribonacci Sock Pattern
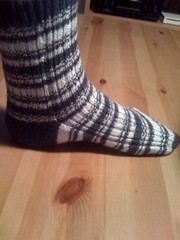
This sock is constructed from the top down with a short row heel and toe. The ribbing and stripe pattern are inspired by the Fibonacci sequence. The cuff, heel and toe are worked in a main color, and the contrast color is paired with the main color for the striped leg and foot.
Materials
Needles: Set of 4 doublepointed needles, size 2 (or size needed to obtain gauge
Tapestry needle
Yarn: Any sock/fingering weight yarn will work for this pattern. Sample shown uses Schachenmayr Nomotta Micro Bamboo. Solid colors show off the stripe pattern best, but you could experiment with a solid main color and a contrast color in a complementary variegated colorway.
Main color (MC): 2 skeins (about 300 yards)
Contrasting color (CC): 1 skein (about 200 yards)
Gauge: 8 stitches per inch in Rib pattern
Size: Women’s medium
Pattern notes
Rib pattern, over 8 stitches: *K1, P1, K2, P1, K1, P2*
Stripe sequence, over 24 rows:
Row 1: CC
Row 2: MC
Rows 3-4: CC
Rows 5-7: MC
Row 8-12: CC
Row 13: MC
Row 14: CC
Rows 15-16: MC
Rows 17-19: CC
Rows 20-24: MC
Cuff
Using long tail cast on and MC, cast on 64 stitches. Join to work in the round, taking care not to twist stitches. Arrange on three double-pointed needles as follows:
Needle 1: 16 stitches
Needle 2: 16 stitches
Needle 3: 32 stitches
Work K1, P1 ribbing for 12 rounds (or desired cuff length).
Leg
Leg is worked in the rib pattern (*K1, P1, K2, P1, K1, P2*, repeat to end of round) and stripe sequence (see above). Note that stripe sequence begins with CC. When changing colors, bring the new color up from beneath the current color. Hold the color not in use behind the work. To neaten floats, wrap unused color around the active color on rows 6, 10, 18, and 22. Work rows 1-24 of stripe sequence twice. Work rows 1-6 of stripe sequence once more.
Heel
Heel is worked on the 32 stitches on Needle 3, using MC. The stitches on Needles 1 and 2 form the instep and will rest while the heel is fashioned. The contract color also rests during this time.
Begin by unknitting the last stitch on Needle 3, and place on free needle. Turn the work.
Row 1 (WS): P30, turn.
Row 2 (RS): K29, turn.
Row 3: P28, turn.
Row 4: K27, turn.
Row 5: P26, turn.
Continue in this manner, working one fewer stitch each row, until there are 14 stitches unworked in the center of the needle.
Next Row (RS): K14, slip 1, yarn forward, place slipped stitch back on left needle and turn.
Next Row (WS): P14, slip 1, yarn back, place slipped stitch back on left needle and turn.
Next Row: K15, wrap and turn.
Next Row: P16, wrap and turn.
Continue in this manner until all stitches have been worked.
Foot
Resume the stripe sequence for the foot and continue in pattern as set (rib pattern for instep stitches and stockinette for bottom of foot). Work rows 7-24 of the stripe sequence, then work rows 1-24 of the stripe sequence. Work rows 1-12 of stripe sequence once more. Break yarn of CC ONLY – main color is used for toe.
Toe
Toe is worked on the 32 stitches on Needle 3, using MC. The stitches on Needles 1 and 2 will rest while the heel is fashioned.
Begin by unknitting the last stitch on Needle 3, and place on free needle. Turn the work.
Row 1 (WS): P30, turn.
Row 2 (RS): K29, turn.
Row 3: P28, turn.
Row 4: K27, turn.
Row 5: P26, turn.
Continue in this manner, working one fewer stitch each row, until there are 14 stitches unworked in the center of the needle.
Next Row (RS): K14, slip 1, yarn forward, place slipped stitch back on left needle and turn.
Next Row (WS): P14, slip 1, yarn back, place slipped stitch back on left needle and turn.
Next Row: K15, wrap and turn.
Next Row: P16, wrap and turn.
Continue in this manner until all stitches have been worked.
Finishing
Turn sock inside out. Slip stitches from Needle 2 to Needle 1. Use three needle bindoff and MC to join stitches on needles 3 and 1. Break yarn. Weave in ends.
Variations
Make symmetrical socks by reversing the rib pattern for the second sock as follows: *P2, K1, P1, K2, P1, K1*
Make “negative image” socks and use only two skeins of yarn by reversing the MC and CC for the second sock.
Thursday, April 03, 2008
Scrap Yarn Rug - WIP
Using up lots of different scraps and partial balls to make a large rug. It's a bit addictive. I'm enjoying seeing how the different colors come together.

Monday, March 31, 2008
One Hour Bib

A very last minute baby gift. Actual time elapsed depends on your personal knitting speed.
Materials
Size 11 needles
Lily Sugar ‘n’ Cream yarn, 1 skein (120 yds) – held double throughout
Tapestry needle
Gauge in garter stitch – 3.5 stitches per inch. Exact gauge is not essential
Pattern
Using long tail cast on and holding two strands of yarn together throughout, cast on 24 stitches. Knit all stitches in every row until piece measures 8.5 inches.
On the following right side row (tail from long tail cast on will be on the right-hand side of the piece, bind off all stitches, but leave last stitch on the needle. Do not break yarn.
Keeping the right side facing you, rotate the work 90 degrees to the right, so that the active stitch is now in the upper right corner of the piece. Pick up one stitch for each garter ridge along this edge.
Knit three rows even.
On the following right side row, K3, bind off to last three stitches, K3. Knit back and forth on three active stitches until strap measures 10 inches. Bind off. Break yarn. Join yarn to wrong side of the three remaining stitches. Work even until second strap measures 10 inches. Bind off. Break yarn. Weave in ends.
Wednesday, February 06, 2008
Heartstrings Hat Pattern
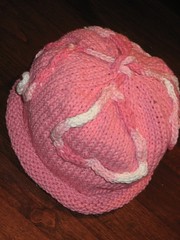
A sweet, simple hat for the little Valentine in your life. I started with one a basic hat recipe (I like the ones in Susan Anderson's Itty Bitty Hats) and embellished with hearts from I-cords knitted out from the top of the hat.
Size: Toddler (about 1-2 years)
Yarn:
MC: 120 yards worsted weight yarn (1 skein Lily Sugar ‘n’ Cream Solid Cotton: Pink)
CC: 40 yards worsted weight yarn (1 skein Lily Sugar ‘n’ Cream Solid Cotton: Pink and white variegated))
Materials:)
Size 6 16” cicular needle)
Size 6 double-pointed needles, set of 5)
Stitch marker)
Gauge: 5 stitches per inch in stockinette stitch
Pattern:
With MC, cast on 80.
Join for knitting in the round.
Place a stitch marker to denote beginning of round.
Knit every round until body of hat measures 6.25” from bottom edge (unroll as needed to measure)
Decrease for crown of hat as follows, switching to dpn’s as needed to accommodate smaller number of stitches.
Round 1: *K6, k2tog*, repeat to end of round
Round 2:*K5, k2tog*, repeat to end of round
Round 3:Knit
Round 4:Knit
Round 5:*K4, k2tog*, repeat to end of round
Round 6:Knit
Round 7:*K3, k2tog*, repeat to end of round
Round 8:Knit
Round 9:*K2, k2tog*, repeat to end of round
Round 10:Knit
Round 11:*K1, k2tog*, repeat to end of round
Round 12:*K2tog*, repeat to end of round
You should have 10 stitches remaining. Arrange stitches as follows on 4 double-pointed needles:
Needle 1: 2 stitches
Needle 2: 3 stitches
Needle 3: 2 stitches
Needle 4: 3 stitches
You will now be working with the contrasting color (CC) to make the cords that will form the top of the hat and the applied heart designs,
To make I-cord: On every row, *k to end, do not turn work, slide stitches to other side of needle*, repeat until cord is desired length
With CC:
Needle 1: Work 2 stitch I-cord for 16”. SSK. Fasten off remaining stitch and break yarn, leaving a 12” tail.
Needle 2: Work 3 stitch I-cord for 16”. Slip 1, SSK, pass slipped stitch over. Fasten off remaining stitch and break yarn, leaving a 12” tail.
Needle 3: Work 2 stitch I-cord for 16”. SSK. Fasten off remaining stitch and break yarn, leaving a 12” tail.
Needle 4: Work 3 stitch I-cord for 16”. Slip 1, SSK, pass slipped stitch over SSK. Fasten off remaining stitch and break yarn, leaving a 12” tail.
Finishing:
Tie together the two 2-stitch cords in a loose knot to close the opening at the top of the hat. Tie together the two 3-stitch cords over the top of the first knot. Don’t pull these tight and deform the shape of the hat.
Lay each cord out in a heart shape on the outside of the hat, and use the long tail at the end of each cord to attach to the body of the hat. I found it easiest to tack down the point at the bottom of the heart, then the indentation at the top, and then a few points around the perimeter of the shape.
Weave in all ends.
Size: Toddler (about 1-2 years)
Yarn:
MC: 120 yards worsted weight yarn (1 skein Lily Sugar ‘n’ Cream Solid Cotton: Pink)
CC: 40 yards worsted weight yarn (1 skein Lily Sugar ‘n’ Cream Solid Cotton: Pink and white variegated))
Materials:)
Size 6 16” cicular needle)
Size 6 double-pointed needles, set of 5)
Stitch marker)
Gauge: 5 stitches per inch in stockinette stitch
Pattern:
With MC, cast on 80.
Join for knitting in the round.
Place a stitch marker to denote beginning of round.
Knit every round until body of hat measures 6.25” from bottom edge (unroll as needed to measure)
Decrease for crown of hat as follows, switching to dpn’s as needed to accommodate smaller number of stitches.
Round 1: *K6, k2tog*, repeat to end of round
Round 2:*K5, k2tog*, repeat to end of round
Round 3:Knit
Round 4:Knit
Round 5:*K4, k2tog*, repeat to end of round
Round 6:Knit
Round 7:*K3, k2tog*, repeat to end of round
Round 8:Knit
Round 9:*K2, k2tog*, repeat to end of round
Round 10:Knit
Round 11:*K1, k2tog*, repeat to end of round
Round 12:*K2tog*, repeat to end of round
You should have 10 stitches remaining. Arrange stitches as follows on 4 double-pointed needles:
Needle 1: 2 stitches
Needle 2: 3 stitches
Needle 3: 2 stitches
Needle 4: 3 stitches
You will now be working with the contrasting color (CC) to make the cords that will form the top of the hat and the applied heart designs,
To make I-cord: On every row, *k to end, do not turn work, slide stitches to other side of needle*, repeat until cord is desired length
With CC:
Needle 1: Work 2 stitch I-cord for 16”. SSK. Fasten off remaining stitch and break yarn, leaving a 12” tail.
Needle 2: Work 3 stitch I-cord for 16”. Slip 1, SSK, pass slipped stitch over. Fasten off remaining stitch and break yarn, leaving a 12” tail.
Needle 3: Work 2 stitch I-cord for 16”. SSK. Fasten off remaining stitch and break yarn, leaving a 12” tail.
Needle 4: Work 3 stitch I-cord for 16”. Slip 1, SSK, pass slipped stitch over SSK. Fasten off remaining stitch and break yarn, leaving a 12” tail.
Finishing:
Tie together the two 2-stitch cords in a loose knot to close the opening at the top of the hat. Tie together the two 3-stitch cords over the top of the first knot. Don’t pull these tight and deform the shape of the hat.
Lay each cord out in a heart shape on the outside of the hat, and use the long tail at the end of each cord to attach to the body of the hat. I found it easiest to tack down the point at the bottom of the heart, then the indentation at the top, and then a few points around the perimeter of the shape.
Weave in all ends.
Tuesday, January 01, 2008
Happy New Year!
Here's wishing everyone a safe and fruitful 2008.
Our year got off to a notable start when I woke up this morning to see that almost half of the huge ash tree in our yard had blown down in the overnight windstorm, and had fallen toward the house. One great big limb is filling our side yard, and Greg spent four hours in the back and on the roof just to get branches off of the house. The whole tree will need to come out; it's split all the way down the trunk and one of the other segments still standing is creaking. Luckily, it appears that there is no major damage to the roof, and no one was hurt. Surely an omen of an exciting year to come.
Our year got off to a notable start when I woke up this morning to see that almost half of the huge ash tree in our yard had blown down in the overnight windstorm, and had fallen toward the house. One great big limb is filling our side yard, and Greg spent four hours in the back and on the roof just to get branches off of the house. The whole tree will need to come out; it's split all the way down the trunk and one of the other segments still standing is creaking. Luckily, it appears that there is no major damage to the roof, and no one was hurt. Surely an omen of an exciting year to come.
Monday, December 03, 2007
In the bag
I'm about done with the body of this Noro bag, and started working the flap this evening while putting the baby to sleep. Then it was Monday night work per usual, so now I'm sleepy and ready for bed.
Sunday, December 02, 2007
Elfy Hat
I whipped this up this weekend from some stashed Sugar 'n' Cream. B's most recent hat was her pumpkin hat, and I needed to catch up the seasonality of her headgear.

Saturday, December 01, 2007

Friday, November 30, 2007
Eve of December
It's cold tonight - I have the laptop on my lap right now more for warmth that to surf. I started a little holiday hat for the Biscuit tonight. We have our company kid party tomorrow, and plan to get our holiday baking and whatnot going this weekend.
Thursday, November 29, 2007
Cyber Monday, Thursday, Whatever
I just did about 70% of my Christmas shopping, online, on Amazon. Gotta love the interwebs.
I finished up the Cash Iroha scarf today, including the fringe. I cast on for a Kureyon bag about three times and finally settled on a decent width.
I finished up the Cash Iroha scarf today, including the fringe. I cast on for a Kureyon bag about three times and finally settled on a decent width.
Wednesday, November 28, 2007
Knitting in the News: Sock Industry Tariffs
I heard this story on NPR yesterday about the sock industry of Fort Payne, Alabama, and the role sock tariffs played in trade agreement decisions. I recommend it.
Tuesday, November 27, 2007
Happy Accident Scarf Pattern
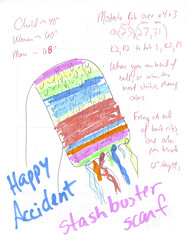
The mistake rib stitch pattern is very easy but looks more complicated than it is – every row is the same. If it did evolve from a mistake, it was a happy accident that results in a lovely fabric
This stashbuster scarf makes use of all those little dribs and drabs of yarn you probably have left over from other projects, too small for single skein projects but too big to just throw out. For best results, use the same weight of yarn and the same type of fiber. Beyond that, mix colors and styles to your heart’s content. A multi-colored corkscrew fringe adds another element of fun to this design.
Your stripes will be random widths, depending on how much yarn is in each ball. For example, if your stash happened to have several small balls of yarn that are the same colors as the highlighters on my desk, you may end up with something like the sketch. I have a lot of Cascade 220 wool remnants from a log cabin blanket I’m making that will be perfect for this project.
Materials
500-700 yards of aran or worsted weight yarn, random amounts of various colors (see notes above)
One pair size 10.5 needles, or size needed to obtain gauge
Tapestry needle
Pattern notes
Mistake Rib: *K2,P2* to last 3 stitches, K2, P1
Gauge: 20 stitches = 4 inches in mistake rib pattern
Sizes: Child/SouthernCalifornia (Tween/Central California, Woman/Northern California, Man/Minnesota)
Scarf
Cast on 23 (23, 27, 31) stitches. Work every row in mistake rib pattern. Whenever you come to the end of a ball of yarn, or when the spirit moves you, change to a new yarn.
Work until piece is as long as the intended wearer is tall, or about 42 (56, 64, 70) inches from cast on row.
Bind off in pattern.
Corkscrew Fringe
Make 20 (20, 24, 28). Each corkscrew can be a different color, you can make matched pairs, or all corkscrews can be the same color.
Cast on 36 stitches.
Row 1: Increase by knitting into front, back, and front again of each stitch
Row 2: Bind off, purlwise
Twirl around your finger to form into corkscrew shape.
Finishing
Attach 5 (5, 6, 7) corkscrews to each side of each end of the scarf. Center a corkscrew at the end of each prominent rib of knit stitches.
Weave in all ends. Wear with flair.
Monday, November 26, 2007
Too Many Knits
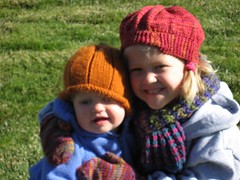
The girls on Thanksgiving, sporting an array of mismatched things I've made for them.
Subscribe to:
Posts (Atom)